What Is Daw Buffer Size and Does It Affect Sound Quality?
The instructions for setting up any DAW (digital audio workstation) normally include some information on setting the I/O (input/output) buffer size.
The reasons for doing this never seem to be explained properly. The guidance usually focuses on how buffer size affects latency, but it’s not made clear if the settings affect the sound quality.
In this article I want to explore what DAW buffer size is and whether the settings chosen could have an effect on the quality of sound produced.
A buffer is a temporary computer storage area that holds data ready for the CPU to use as required. DAW buffer size can have an effect on latency (delays when recording), and how well the computer handles demands placed on it. Most sources say that buffer size doesn’t affect sound quality but some music producers claim that it does.
When exploring this I found that buffer size isn’t something that you just set and forget. You need to adjust it depending on what you are doing – one range of setting for recording and another for mixing.
What Is Daw Buffer Size?
As you know, your computer has a central processing unit, or CPU, that does all the processing of instructions for all the applications you use. The relevant application in this case is your DAW software.
Since the CPU is running all the applications on your computer at the same time, there are storage areas called buffers that store information so that it is available whenever the CPU needs to process it.
For most applications on your computer you never have to think about the buffer size, or have to adjust the buffer size for different purposes. This is one of the reasons why it can be confusing when you read about it in your DAW set up instructions.
Buffer Size Is Measured in Samples
If you look at the buffer size settings in the preferences section of your DAW you will probably see that it is measured in “samples”. The word sample here can be confusing since we are used to thinking of samples in relation to drum hits or other sounds.
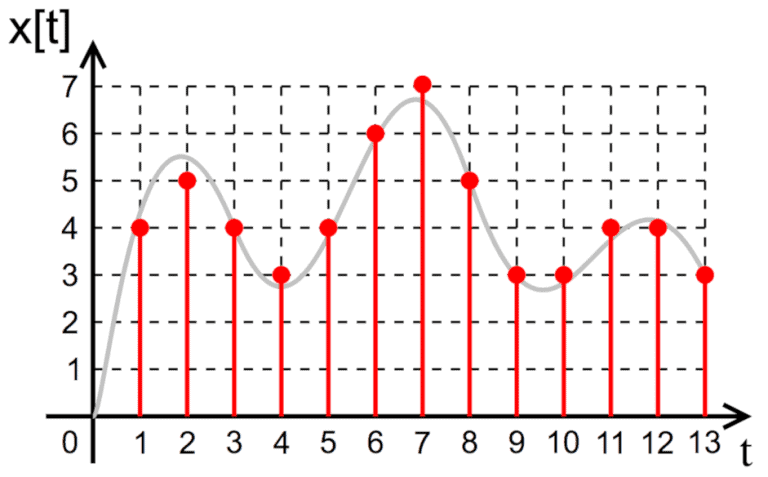
In this context a sample refers to one of the little slices of information produced when an audio signal is converted to a digital signal. For example, the standard sample rate used for CDs was 44.1 kHz, which means that each second of audio is chopped up into 44,100 slices (or samples) of digital information.
If you’re not sure about the difference between analog and digital signals and the way that an audio interface processes them you can read about analog-digital conversion and sample rate in this article.
As information is collected from a keyboard or microphone and sent into the computer via an audio interface it is stored in the buffer to wait until the CPU is free to process it.
Similarly, the processed information coming out of the CPU is stored in a buffer until it can be moved on to the next stage in its journey. The signal could be sent out through an audio interface to monitor speakers for example.
This journey that the signal takes is sometimes referred to as the “round trip”, since the sound is going into and coming back out of the computer before you hear it.

Typical values for DAW buffer size range go from 32 to 1024 (Logic Pro X), 32 to 2048 samples (Ableton Live and Cubase) and 16 to 4096 (Studio One).
This means that, depending on the buffer size settings you choose, there could be between 16 and just over 4,000 slices of the audio signal waiting in the buffer for the CPU to process the information.
A low, or small, buffer size means that a small amount of information is stored in the buffer, and a large buffer size means that a large amount of information is stored waiting to be processed.
A lower buffer size means that the CPU doesn’t have to wait so long for the buffer to fill up. A larger buffer size means that the CPU may have to wait a while for the buffer to fill up, which can result in delay.
Buffer Size Settings to Reduce Latency When Recording
The guidance for setting your DAW buffer size usually talks about making sure the “latency” is as low as possible. Latency is relevant when recording instruments into your DAW.
If you have a MIDI keyboard attached to your computer you may experience a delay between pressing a key and hearing the sound. This delay is called latency.
Latency delay can be a problem if you are recording vocals or an instrument like a guitar
The vocalist or guitarist will be listening to their performance as it’s being recorded, so any latency will make it very difficult for them since there will be a delay between the sound the produce and the sound coming out of the speakers or headphones.
Direct Monitoring Avoids Latency When Recording
Latency is one reason why audio interfaces often have a direct monitoring option. Direct monitoring sends the sound coming into the audio interface from a microphone or instrument straight back out, which avoids any latency introduced by the computer.
This direct monitor signal can be sent to headphones for the vocalist or guitarist to monitor the performance. The main signal still goes into the computer to be recorded by the DAW.
Small Buffer Size Reduces Latency
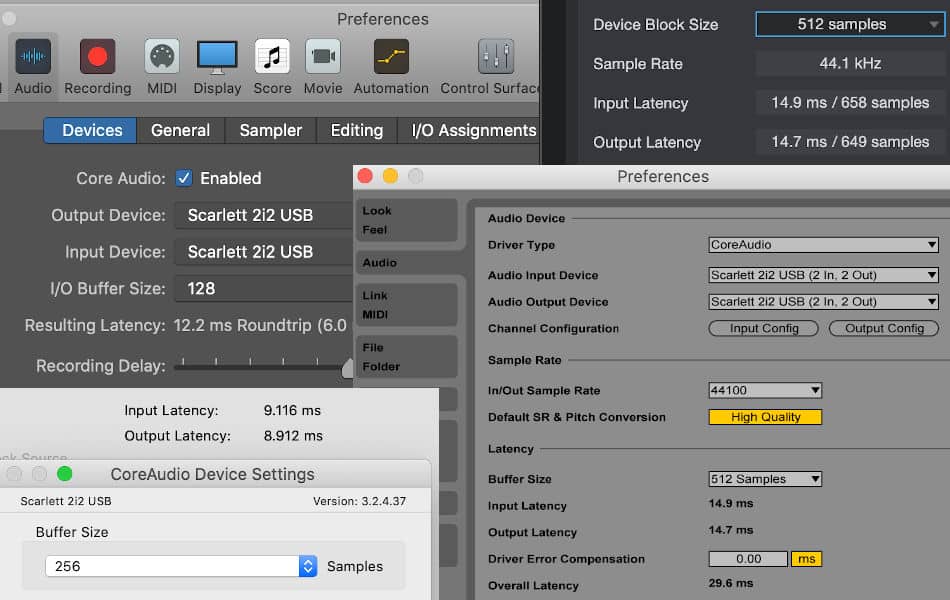
In the preferences section of your DAW you can adjust the buffer size to the value required. You can decide which buffer size value to choose by looking at the amount of latency resulting from each buffer size option, which is usually displayed below.
You should be able to see from the display that selecting the smallest buffer size will result in the lowest latency (or shortest delay).
Buffer Size Affects CPU Performance
Another issue relating to buffer size is the the way it can affect the CPU operations. A larger buffer size means that the CPU should always have data available for processing when it needs it.
A small buffer size can mean the processor doesn’t have information available when it needs it, which can interrupt the data stream leading to unpleasant popping and clicking sounds.
It’s this issue that limits how low you can go with buffer size in your DAW. If you select the lowest buffer size and then play a track in your DAW you will probably hear this audio interference caused by the strain that a low buffer size places on the CPU.
The way to deal with this is to increase the buffer size step by step until the unpleasant sounds are no longer present. This should give you the optimal recording settings with low latency but no audio interference.
Buffer Size Settings for Arranging and Mixing
When arranging and mixing tracks that have already been recorded or produced from sampled loops, you need to maximize the processing power of your computer.
We have some information on how to prepare your tracks for audio mixing in this article.
When mixing tracks you are likely to use more and more plug-ins of various types, and each of these places additional demands on your computer’s CPU.
The main issue is no longer latency, but ensuring that your computer is able to handle the audio processor plug-ins that will be used to produce the final mix of your track.
This means that once you move on to the mixing stage you should go into the preferences section for your DAW and increase the buffer size.
As outlined earlier, a larger buffer size helps to ensure the CPU can work as efficiently as possible. Too low a buffer size can be a particular problem at this stage, with pops and click sounds being heard, and maybe even your computer becoming overloaded.
DAW software often displays an overload warning when this happens. Your DAW should have a meter that displays how hard the computer CPU is working, and increasing the buffer size should improve this quite noticeably.
Pro Tools Has Options for Recording or Mixing
The instructions for setting the buffer size when setting up your DAW normally focus on minimizing latency without introducing popping and clicking sounds as outlined above.
The first time I realised that you might need to change the buffer size settings depending on whether you are recording or mixing was when I first set up Pro Tools | First (the free version of Pro Tools – you can read more about it in this article).
In Pro Tools there is an option to set up what they call the Playback Engine. This is similar to the DAW preferences section we looked at earlier, where you can select your audio interface.
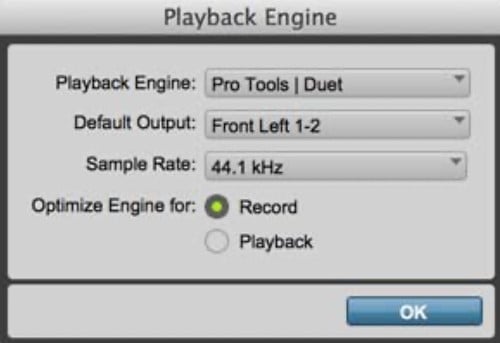
The difference in Pro Tools | First is that you don’t get the option to choose a particular buffer size. Instead you are asked to choose whether you want to optimize the Audio Engine for recording or playback.
The software adjusts the other settings based on the option you choose. Before I saw this I had never really considered changing the buffer size settings depending on whether I was recording or mixing (playback).
Increase Buffer Size for CPU-Heavy Activities
I have read quite a number of books and watched a lot of videos on using DAW software, and I don’t remember this being mentioned, let alone recommended.
Understanding this has made quite a difference. For example, Logic Pro X introduced a new reverb plugin called ChromaVerb, but I hardly ever used it.
This was due to the crackling sound that always started as soon as I turned it on, making me think I needed a new computer. Increasing the buffer size temporarily to one of the highest settings sorted the problem out right away.
Bounce MIDI Tracks to Audio to Reduce CPU Load
Another tip you may have seen is about bouncing your MIDI tracks to audio during the mixing process.
Your DAW should have the ability to produce a new audio track based on each MIDI track, which may be called “bouncing in place”, “rendering in place” or “bounce to track”, depending on your DAW.
You can then inactivate or “freeze” the MIDI tracks so that just the audio tracks are playing. Playing audio tracks makes far fewer demands on your computer’s CPU.
You could keep your audio plugins active for further processing of the bounced audio tracks, or render the tracks with the plug-in effects already within the sound.
The second option means you don’t need to run the plug-ins any more, which lowers the demands on the CPU even further. This could be important if you are mixing a large number of tracks.
This suggestion doesn’t really relate to buffer size, but it could help if combined with a large buffer size when mixing your tracks.
Does Buffer Size Affect Sound Quality?
The second part of the question for this article is about whether the buffer size can have an effect on the quality of sound produced.
We have already seen that too low a buffer size could put a lot of strain on the computer CPU. This can result in disruption of the audio signal, resulting in unpleasant popping and clicking sounds coming out of the headphones or speakers.
However, it’s much harder to find information on whether the buffer size, and this potential audio interference, can affect the sound quality of your audio productions. I have had to put the information here from bits and pieces of information that I have found.
The general view in online music forums and websites seems to be that buffer size doesn’t affect sound quality, and it’s only really sample rate and bit depth that make a difference. You can read more about sample rate and bit depth in this article.
However, since a low buffer size can disrupt audio processing I would expect this disruption to affect the quality of audio being recorded. The problem is normally described in terms of audio playback, but it must surely be an issue for audio being recorded too.
Since a low buffer size is recommended for recording it seems likely that this could be a problem, potentially resulting in a poor quality recording.
The support area of the Focusrite website agrees with this, saying that a larger buffer size might be needed to accurately record an audio signal with no distortion and limited latency. This is where the balance between latency and demands placed on the CPU is important.
Once interference or distortion has been introduced into a recording it might not be possible to remove it, so another recording of the performance could be necessary.
Having said that, as long as the buffer size is large enough to avoid pops and clicks then most people seem to agree that a larger buffer size won’t make any difference to sound quality.
Some Producers State That Buffer Size Affects Sound Quality
Sound quality is quite subjective, so if people say something sounds better there is no reason not to believe them. I have seen a thread on a Logic Pro forum where this was discussed and different view on buffer size and sound quality were expressed.
Even though there is no scientific explanation, and larger buffer size shouldn’t make a difference to sound quality, some very experienced and knowledgeable producers argued strongly that it did.
They said that a higher buffer size resulted in a better sound when mixing, claiming that there was more clarity and definition. Even if the project ran okay at 128 or 256 samples, with no pops of clicks, the sound quality improved if the buffer size was increased to 512 or 1024 sample.
Some other people on the forum suggested that this was due to psychoacoustics, which I took to mean that people hear what they expect to hear. A sort of acoustic placebo effect?
The quality of sound produced by DAW software is of such a high quality that it would probably need years of experience to train the ear to hear these subtle differences, if they exist.
Experienced musicians and producers can often hear differences that the most people can’t. I think I’ll accept that buffer size can have an effect on sound quality, even though it’s not clear why.
