Is Ableton Live Good for Mixing and Mastering?
When people think of Ableton Live, what do they normally think about?
Creating tracks and live performance, probably? Beat-making and loop-based production for electronic dance music or hip-hop?
You will find a large number of YouTube videos, online courses and articles about using Ableton in the creative part of the music production process.
However, if mixing and mastering are mentioned in these Ableton resources at all, it sometimes seems like an afterthought.
This might make you wonder if Ableton is any good for mixing and mastering.
Books and video courses on mixing and mastering usually talk about more traditional DAWs like Pro Tools, Logic Pro or Cubase, rather than Ableton Live.
So you might think that you have to transfer your stems or individual audio tracks from Ableton to these other DAWs for mixing and mastering if you want to do it properly.
Most people agree that Ableton Live is an amazing tool for the creative aspects of music production, but what what about the later stages of the process?
This is what made me want to look at whether Ableton Live is good for mixing and mastering. Of course it can be used for this, but is it any good?
Before we do that, we’ll start by exploring what we mean by audio mixing and mastering, and why these processes are important in music production.
What Is Audio Mixing?
Back in the days when music was usually recorded in large professional studios, the production process was more clearly divided into separate stages.
First someone would write the song or compose the music. An arrangement of the song (or instrumental piece) would be organised.
Then the individual parts of the production would be recorded. For pop (including, rock, country, soul, etc), this would maybe start with a drum track, followed by individual instruments, and finally vocals.
The next stage would be mixing, and this might be done by different people in a different studio than the one used for recording.
The mix engineers would take the individual audio tracks and balance their relative levels as they are sent to the master output.
Mix engineers would usually want dry tracks without added effects so that these effects could be added during the mixing process in the way the engineer wanted it done.
Music Production Has Become Democratized
Fast forward to today, and music production tools have become much more widely available. This is often referred to as the democratization of the music industry.
Although music is still recorded in large professional studios, a lot of music production is now done at home. Even by professional artists and producers (and a lot of artists are producers now).
Producers use DAW software, which provides much more control over the whole process than was possible in the past.
The Final Mix
You often hear people talking about mixing as you go, which means they are doing some basic audio mixing during the music creation stages.
However, there comes a time in the production process when you want to listen to what you have and blend the parts together to produce the final mix.
This is the stage we’re thinking about here, where a proper mixing environment could be important. Does Ableton Live have the tools and functionality for an effective mixing process?
The Mixing Process
The starting point for this mixing process is some audio and MIDI tracks. In Ableton this would be in Arrangement View with the tracks arranged linearly.
You can read about how to prepare you tracks for mixing in another article on our website.
Even if the tracks already have effects added, a lot of mix engineers will remove all the effects and add their own.
Mix engineers may also do drum replacement, where their preferred drum sound are added alongside, or instead of, the original drum track(s).
Earlier, I said that mix engineers often wanted audio tracks recorded dry (without audio effects) so that they could add their own during the mixing process.
You should record your audio (instruments and vocals) so that the audio effects aren’t a permanent part of the recorded sound for maximum flexibility during mixing.
Ableton Live Is Now a Full-Featured Daw
Although Ableton Live started off as a loop-based live performance and recording tool, it’s now a full-featured DAW. However, it origins leave a lot of people doubtful about its abilities for mixing tracks in a music production.
Some of the things discussed are based on things people sometimes say about Ableton when it comes to mixing tracks.
Ableton Doesn’t Have a Dedicated Mixer
Something I hear a lot when it comes to mixing tracks in Ableton Live is that it doesn’t have a dedicated mixing window.
Other DAWs like Pro Tools, Logic Pro and Cubase let you open a window that contains features and controls dedicated to mixing.
These mixer windows are usually based on the vertical channel strips on a traditional hardware mixing desk.
The audio signal comes in at the top of the strip, passing through various audio effects (inserts and sends) before passing through a volume fader and on to the master output.
The volume fader usually has a level meter next to it so that you can see the level of the audio on each track.
The channel strips also include a pan control for placing the sound to the left or right of centre, and buttons to solo or mute the track.
Ableton’s Mixer Is Part of Session View
Ableton doesn’t have a separate mixer window. The vertical channel strips outlined above are part of the Session View window, with each channel of the mixer below with a track containing clip slots.
When session view is first opened the mixer section is quite small near the bottom of the screen, but the mixer can be resized or hidden altogether (if you need to be able to see the maximum number of clip scenes).
When you need to see more of the mixer during the mixing process it can be enlarged. Dragging upwards at the top of the mixer lets you increase the height of the mixer to around half the total height of the window.
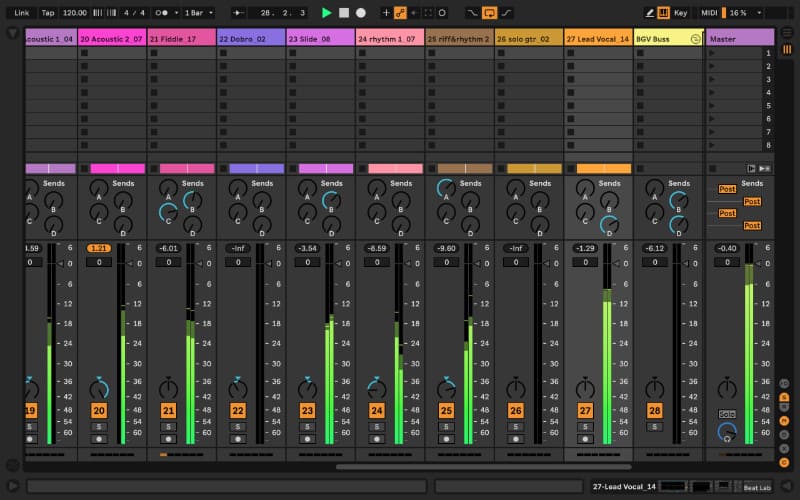
Even with the mixer expanded like this, some people (including me) don’t like the clip slots being visible above the mixer and find this a distraction.
For example, you may have produced your audio and MIDI tracks in Arrangement View but when you come to Session View to use the mixer there are session clips there (there aren’t any in the image above).
I know this isn’t a huge deal, but I wonder if it could be made possible for the mixer to be dragged right up and over the clip slots and scenes. If this is already possible, I don’t know how to do it.
Track Status Display
Something that is very useful above the mixer channels is the Track Status Display. When your tracks are playing in the Arrangement View, the Track Status Display shows a miniaturised version of the clips playing.
You can watch the clips and spaces between clips move past the playhead in this small display, which helps to focus on what audio is playing and when it’s being played.
The audio in the image above runs for the full length of the song, so no spaces are visible.
Can the Mixer Be Opened in a Separate Window?
Other DAWs let you open the mixer in a separate window, and some people have suggested Ableton could also introduce this.
I believe Ableton have a One Window concept for Ableton, so it’s unlikely they would introduce a separate mixer window.
However, you can open the Session View and Arrangement View in a Second Window (View -> Second Window).
If you have a second computer monitor, Session View could be displayed on one and Arrangement View on the other.
The monitor displaying the mixer would still have the session view clips above it, so the point I made earlier about wanting to able to hide these would still apply.
Mixing in Arrangement View
Another criticism of mixing in Ableton relates to the mixing tools in Arrangement View.
The horizontal, linear organisation of the tracks in Arrangement View is what most people think of when they imaging mixing in music production.
Each track in Arrangement View has a level meter to visualise the level of audio in the track, together with volume (gain), pan, solo, mute, and effects send level controls.
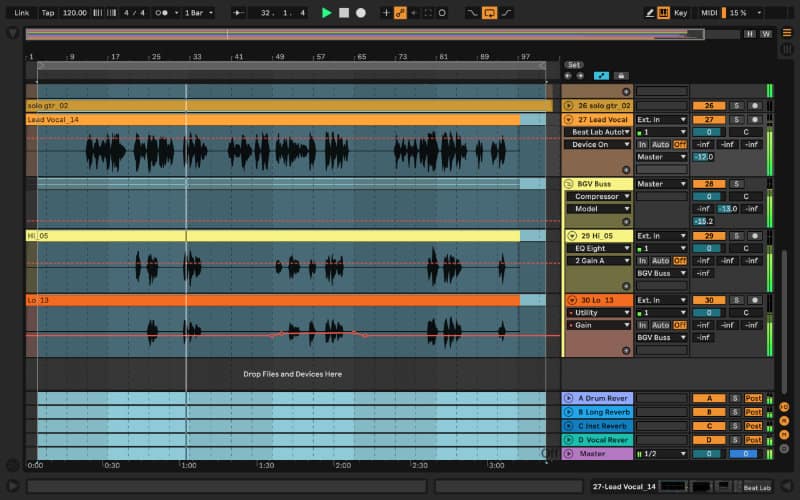
People often say that these controls are too small and fiddly to use when mixing. They say that they want to see (and hear) the horizontal tracks playing and be able to make adjustments using the controls.
What is forgotten though, is that you can’t usually do this in other DAWs either. You might be able to open the mixer in a separate window and see the tracks underneath, but this isn’t ideal.
Ableton actually gives you the ability to see the tracks playing and make adjustments using these small, unobtrusive controls at the far end of the arrangement window. Other DAWs don’t have this (as far as I’m aware).
What some people see as a limitation for mixing in Ableton is actually one of its strengths.
Also, don’t forget that you can follow the Arrangement View tracks playing while using the Session View mixer via the Track Status Display, as mentioned earlier.
Ableton Live Lets You See All the Devices Together
The Devices for a track in Ableton are placed in a space at the bottom of the window in both Session View and Arrangement View.
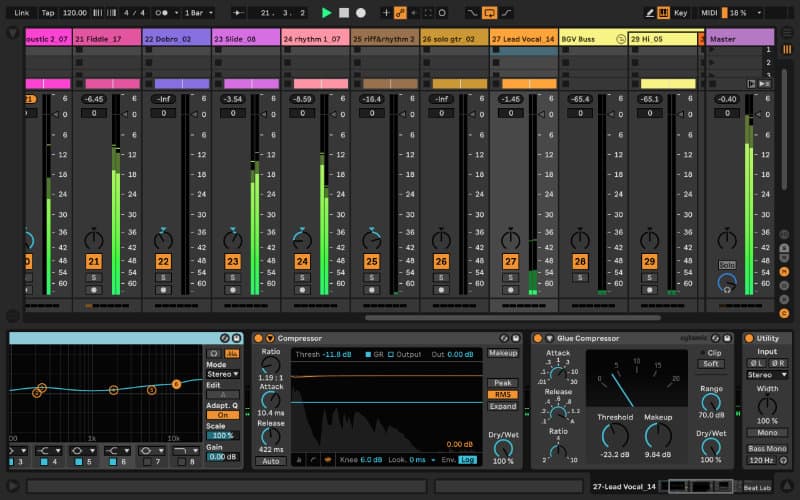
This lets you see quickly which devices are included in the device chain and which order they are in. You can also make real-time changes to the device settings very easily, or add remove or rearrange devices.
This convenient organisation of devices in the chain for each individual track is something that is often praised regarding mixing Ableton.
This only really applies when using Ableton’s own stock devices. If you use third-party devices you will need to open up the device (by clicking the little spanner in the placeholder device) and adjust the controls outside linear device chain area.
Gain Staging in Ableton
While we are talking about strengths of Ableton for mixing, we should look at Gain Staging.
Gain staging is where you look how the various devices in a signal chain affect the level of the audio signal.
The audio effects devices in Ableton have a small built-in input level meter (on the left) and an output level meter (on the right).
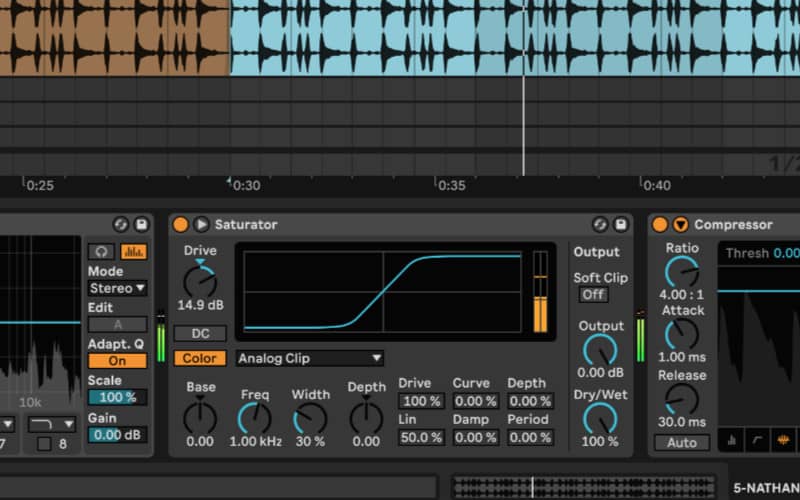
When devices are organised one after the other in a chain, the output level of one device is the input level for the next one.
These level meters let you monitor the level of audio entering and leaving a device to see what effect the device has had.
The level meters display information relating to the gain of the signal, so you can monitor the gain at each stage. Monitoring and adjusting these levels is referred to as gain staging.
In the image above you can see that the Saturator device is increasing the gain of the signal and the device output meter is going into the red.
You need to check the effect that each device has on the gain relating to the audio signal. If the audio signal gain becomes too high, which risks clipping distortion, it’s important to be able to see where the excess gain is being introduced.
The level meters in Ableton let you monitor the gain relating to each device very easily. I’m not aware of any other DAWs that let you do this in the same way (although I’m sure some of them do.
Ableton Doesn’t Have Bounce/Render In Place
Several DAWs enable you to export the audio from a track directly onto a new track. This process keeps the new audio aligned with the original, so it’s in the correct place in the arrangement.
This audio export is usually called a Bounce or Render. Because the new audio is aligned with the original it’s called Bounce in Place (in Logic Pro X) or Render in Place (Cubase).
Ableton Live doesn’t seem to let you do this (yet). In Ableton you need to export the selected track (or group of tracks) as audio, and bring the audio back into Ableton.
This isn’t too difficult, but it can be a bit of a pain when you are trying to work quickly.
Having said that, the professional standard DAW for mixing audio is Pro Tools, and I can’t see how to do it there either.
Bounce, Commit and Move On
So why would you want to export your individual audio and MIDI tracks (or even individual clips) to new audio tracks like this?
One reason music producers do this because they want to commit whatever is being played on the track to audio, so that the particular element is finalised and they can move on.
I have heard and read about Max Martin being keen to commit the parts of his productions to audio as quickly as possible. The idea is to make a decision about how you want the part to sound and move on to the next thing quickly.
At the time of writing, Max Martin is apparently worth $260 million. He may have been worth considerably less if he spent ages fiddling around for ages when mixing his tracks, rather than committing to audio quickly and getting on with the work. Just a thought.
Reducing Strain on CPU
Another reason bouncing individual tracks (or groups of tracks) to audio is to save your computer’s CPU. A large number of devices are used during mixing, and each one adds to the load on the CPU.
MIDI tracks will usually have a software synthesizer or sampler playing MIDI notes.
During the mixing process you are likely to be bringing in a lot of audio effects plugins. For example, EQ (equalization), Compressor(s), Reverb, Delay, Saturation and Filters.
Automation will usually be applied to the effects to vary their intensity throughout the arrangement.
You may also want to apply pitch and timing correction to the recordings on vocal and instrumental tracks.
Once you are happy with the sound for a track (or group of tracks) you can commit it to audio.
Once all the tracks have been rendered as audio you can listen to them all playing together without overloading your computer’s CPU.
You will then adjust the levels of these individual audio tracks to produce the final mix. This will be rendered as a stereo file, which can be used for Mastering.
What Is Audio Mastering?
The simplest definition of mastering is preparing the audio for its final distribution.
Going back to the old days (like we did earlier for mixing, this would mean pressing into a record (although that’s making a comeback), recording onto a cassette tape (so is that), or burning onto a CD (give it a few years, and I’m sure that will come back too).
The most likely method for final distribution now is via streaming of some kind. So Spotify, Apple Music, Tidal, Bandcamp, Soundcloud or similar.
How does mastering prepare the audio for this distribution? Your final mix was rendered as a stereo audio file, so now what?
Mastering Houses
Professionally recorded tracks are usually sent out to a mastering house, where the mastering is done.
You send your stereo audio file to the mastering house and it comes back mastered.
The mastering process can appear quite mysterious, and I wonder whether the mastering houses like it that way.
Inexperienced music produces sometimes think that problems with their track can be fixed by mastering, but any outstanding issues need to be fixed during the mixing process.
Again, this is probably due to the mystery that surrounds mastering. Producers take the track as far as they can and hope that mastering will sort everything out.
You can get a track mastered by a reputable mastering house for around $50. However, even if you have the money you would probably want to see the production process through to the end yourself?
Mastering Your Track In Ableton Live
We have looked at mastering your productions yourself in another article. Here, the focus is on whether Ableton is a good DAW for mastering.
Among other things, mastering is about listening carefully, balancing the sound and making the track as loud as people expect it to be.
For Listening Carefully, Ableton Is as Good as Any Other Daw
I have seen a lot of discussion online about which DAW sounds the best, and whether a particular DAW adds its own color to the sound.
However, in all objective tests the outcome always seems to be that they all sound as good as each other.
Ableton Mastering Plugins – As Good as Any Other Daw
Ableton (Ableton Live Suite in particular) has the audio devices needed for mastering.
For example, Ableton includes compressors, a multiband compressor (Multiband Dynamics), a saturator, a sophisticated EQ plugin, a limiter, and many others.
However, when producers talk about mastering their tracks they are often using third-party plugins specifically designed for mastering.
These plugins run just as well in Ableton as in any other DAW, so the DAW used for mastering becomes much less relevant.
So, if you are mastering your own tracks, Ableton Live is just as good as any other DAW.
Take this together with Ableton’s amazing workflow and you would have to conclude that Ableton is a good DAW for mastering audio.
