Audio Effects Processors – What They Do, a Beginner’s Guide
Audio effects are an essential tool in music production. Effects plugins can transform a sound, and turn a boring track into something really exciting. As I learn more about audio production and studio technique I increasingly value the contribution that audio effects can make.
For example, I have struggled to produce an interesting synthesizer sound, only to find that adding some delay effect to make the sound echo causes it take on a life of its own.
Vocalists have been extremely unhappy with the sound of their voice in a recording until the addition of some EQ and reverb has made them sound every bit as good as the top singers they admire.
The aim here is to take a sweeping look at some audio effects that are commonly used in music production. We haven’t made a distinction between hardware and software effects units.
The focus will be on what the various effects processors do to the sound and what some of the controls found on these units do to modify the effect.
Insert vs Send Effects
Before we look at some specific examples of audio effects I wanted to start with the two main ways that effects are used to process audio.
This refers to how the effects processors are placed in the “signal chain”, the path the audio signal takes, rather than what the effects unit actually does. These are referred to as “insert” effects or “send and return” effects, sometimes shortened to “inserts” and “sends”.
I find it easiest to understand the difference between them by using the example of a guitar plugged into an amplifier. You also have an effects pedal that you want to use with it, and you can either use it as an insert effect or as a send and return effect.
Insert Effects
Insert effects are the easiest to understand. You plug the cable into your electric guitar and plug the other end into the input socket on your effects pedal. You then plug another cable into the output socket of the pedal and plug the other end into the input of your amplifier.
In this case all of the audio signal from your guitar goes into the effects pedal and you can use the controls on the pedal to adjust the amount of effect that is applied to the audio signal.
Send and Return Effects
Send and return effects can be a little more difficult to understand. Staying with the electric guitar example, you plug the cable into your electric guitar as before but in this case the other end of the cable is plugged into a box that splits the signal into two.
There is a control knob on the splitter box that lets you adjust how much of the signal goes to each output.
You take a cable from one output and plug it directly into the input of the amplifier. The cable coming from the other output is plugged into the effects pedal, with the cable from the effects pedal output being plugged into the amplifier. This second output has the effects pedal “inserted” into it.
The difference with the send and return setup is that it lets you control how much of the signal from the instrument goes through the effects pedal.
The control knob on the splitter box mentioned above lets you send all of the signal straight to the amplifier and none to the effects unit, or all of the signal through the effects unit and none straight to the amplifier, or somewhere in between.
If you now imagine that the “splitter box” in this setup has several inputs so that several instruments or vocals can be plugged into it. This would let you set the controls on the effects unit once and have varying amounts of each instrument or vocal routed through it.
This is a very common way of applying effects in DAW music production software, since it lets you cut down on the amount of computer power needed.
Each software effects processor uses computer processing power, so having several tracks routed through the same effects units helps to reduce the demands placed on your computer.
Wet and Dry Signals
You often see a control on an effects processor that lets you adjust how “wet” or “dry” the signal is. Usually the highest the control can be turned up to is totally wet, and when it’s turned right down it’s totally dry.
Wet refers to the portion of the signal that is processed by the effect. The dry portion passes straight through unaffected. Totally wet means all of the signal is affected, and totally dry means none of it is.
If you are using the processor as an “insert” effect the wet/dry control is normally used to control how much of the effect is applied to the signal. If you are using it as a “send” effect you would normally have the control turned all the way up to completely wet, with the amount of effect applied controlled by the portion of the signal sent through the effect by the splitter box mentioned earlier.
Specific Audio Effects Processors
We will move on now to look at some specific examples of audio effects processors, what they do and what the most common controls found on these units do to the sound.
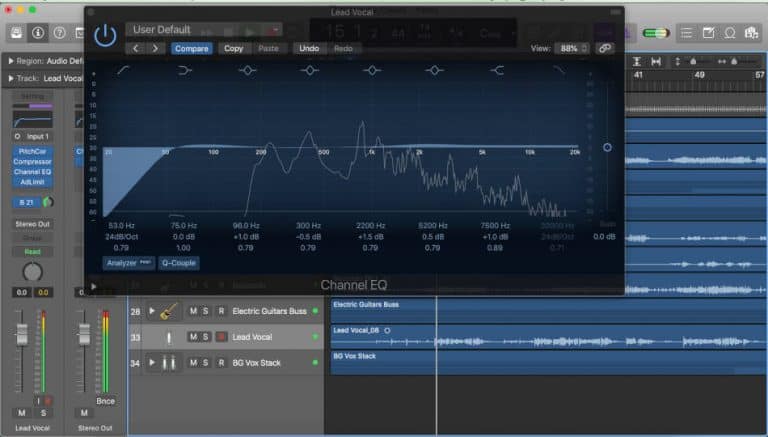
EQ (Equalization)
An introduction to EQ (equalization) usually started by saying that it’s a bit like the tone controls on your stereo.
On your stereo you can reduce or boost the levels of high-pitched sounds with the treble control, and you can reduce or boost the levels of low-pitched sounds with the bass control. More sophisticated tone control can be achieved with a graphic equalizer, which lets you reduce or boost the levels of pitches right across the audible frequency range.
I’m not sure how long it will possible to use this example since not many of the ways people listen to music now include tone controls (or at least controls that can be found easily).
Anyway, that’s pretty much what EQ processing does – it lets you reduce or boost the levels of selected audio frequencies. Gain is the term most used for the level being adjusted. Other terms used instead of reduce include cut or attenuate, and they mean pretty much the same thing.
The reason that EQ is normally used in music production is because it lets you emphasize the frequencies that you want and to make undesirable frequencies less noticeable.
Most music productions involve a number of tracks on which instruments or vocals will have been recorded. Each of these individual tracks may sound great in isolation but when they are mixed together the combined sound can be muddy, with the sound of the individual tracks being poorly defined.
EQ can be applied to each individual track so that you highlight the essential features of the instrument or vocal that the track should be contributing to the mix.
The essential features will usually be within a limited frequency range. EQ processors let you emphasize that particular frequency range, while reducing the levels of the other unwanted frequencies in that track.
The thing that makes these frequencies unwanted is that they belong to other tracks in the mix. If several tracks contain sounds at the same frequency it can start to sound very muddy.
When you do this for each track in the mix you end up with each instrument or vocal sitting in its own little frequency pocket. This means that each track makes its own special contribution to the mix and doesn’t clash with any other track.
In addition to making the tracks sit together in the mix without clashing, EQ can also be applied to the entire mix to reduce the levels of very low frequencies that can sound unpleasant on some sound systems, and reduce the levels of very high frequencies that can make the mix sound “tinny”.
EQ Controls
Here is a brief description of some of the most common controls found on an EQ effects processor.
Frequency Control
The frequency control lets you select the frequency that you want to target. Most software EQ effects processors have a knob or slider that lets you select the frequency. One of the main differences between EQ processors is the number of frequencies you can select on the same unit.
For example, some EQ units only let you select one frequency, some let you select three, and some let you select seven or eight frequencies. Clearly the ability to select more frequencies in a unit gives you more control, but if you are only targeting one or a small number of frequencies this may not be needed.
Gain Control
The gain control lets you decrease or increase the volume level of the selected frequency. There are some different ways that the gain control can work.
A parametric gain control lets you lower or raise the level of the selected frequency like a little peak or dip in the volume. There’s another control (Q-control) that we’ll talk about shortly which lets you make the peak wider or narrower.
A high or low-pass filter allows only the audio signal above a particular frequency (high-pass) or below a particular frequency (low-pass) to pass through. This is like the types of filter found on many synthesizers. These EQ filters can be used to reduce very low frequency “rumble” or high frequency “hiss” from a recording.
A shelf control is similar to the high and low-pass filters outlined above, and are usually called a high-shelf or low-shelf. A high shelf control lets you boost or reduce the levels above a certain frequency, while a low-shelf lets you boost or reduce the level below a certain frequency.
Q-Control
This control confuses a lot of people, and it’s sometimes helpful to explain that “Q” stands for quality. As an analogy, imagine a factory making an item and each is supposed to be the same size.
If the quality control in the factory is low then the range of sizes of the items will be large. if the quality control is high then all of the item will be about the same size.
Going back to the Q-control on the EQ unit. If you turn it up you get a narrower, high-quality, adjustment of the gain level at that frequency. If you turn it down you get a wider, lower-quality, adjustment of the gain level. Low Q causes the frequencies either side of the one selected to be effected more by the gain control. This may be what you want, or you may want to focus more on a particular frequency with a higher Q-level.
To find out more you may be interested in another of our articles on EQ and why it’s important in music production.
Dynamics Processing
The dynamic range and level of the signal can be adjusted using dynamics effects processors. Examples of dynamics effects include compressors, limiters, de-essers, noise gates and expanders.
Compressors
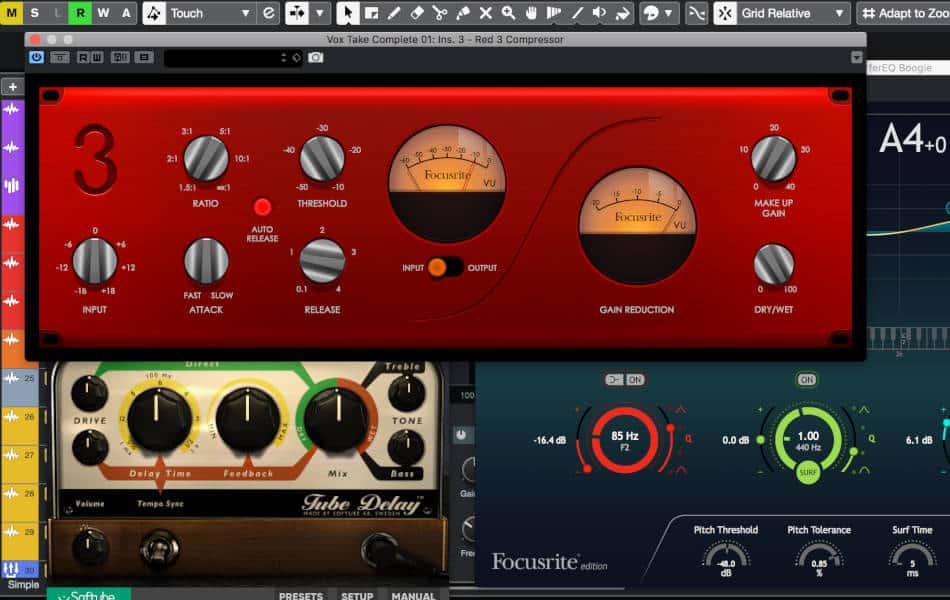
A compressor lets you reduce the peaks in volume in a particular track or in the overall mix without reducing the levels of the quieter parts. This process results in a reduction in the dynamic range of the audio that compression is applied to.
Compression can be used to control the dynamics of an audio recording to make the levels more uniform. It can also be used to boost the overall volume level of an audio track.
In addition, compression can be added to an overall mix to make the parts sound like they belong together. This is sometimes called glue compression, and you can read more about it in another article on our website.
Another result of using compression is that it makes the compressed audio sound like it is closer to you.
This is done by reducing the peak levels as outlined above, which reduces the loudness, then turning the volume level back up to the original level, which is called makeup gain. This has the effect of increasing the volume of the quieter parts, which results in an increase in the overall loudness of the audio signal.
Compressor Controls
Here is a brief outline of the some controls typically found on an audio compressor effects processor.
Threshold Control
The threshold is the level at which the audio signal starts to be compressed. The lower the threshold is set then more of the audio signal will be affected by the compressor. As peaks in the audio signal cross the threshold the compressor “squashes” them. Peaks going over this threshold level are often expressed in decibels (dB) above the threshold.
Ratio Control
The ratio control lets you adjust how much the compressor “squashes” the signal. As the name suggests the control levels are usually marked as ratios, e.g. 2:1, 4:1 8:1, etc.
For example, if the ratio is set at 2:1 and the threshold is exceeded by 4dB then the compressor will reduce the level of the peak to 2dB above the threshold. If the ratio is set to 4:1 then the same peak will be reduced to 1dB above the threshold, resulting in more “gain reduction”.
Attack Time
The attack time control lets you choose how quickly the compressor will start to reduce the gain (squash the level of the audio). This is useful if you want to let the initial peak of the sound through, for example the “attack” of a drum hit, while compressing the rest of the sound. For this you would increase the attack time slightly. if you want compression to apply to all of the sound you would make the attack time as short as possible.
Release Time
This allows you to control how quickly the compressor “releases” and stops compressing (squashing – apologies, I like that analogy) the audio signal. A long release time results in more natural, less noticeable, effect on the audio.
A short release time produces a more noticeable effect, and can help to produce the kind of pumping sound that is popular in some types of dance music.
Knee Control
Compressors often give you the option to choose “hard knee” or “soft knee”. Hard knee means the compressor starts to act as if a switch has been thrown and it goes from off to on. Soft knee means that the compressor starts to act a little more gradually, as if a knob is being turned up from off and gradually going up to it’s highest level.
Makeup Gain
As the name suggests, the makeup gain control lets you turn the volume level (the gain) back up to the level it was before the audio signal was compressed. Since it’s only the loudest part of the audio that has been compressed, turning the gain level back up after compression increases the volume of the quieter parts of the audio, producing an increase in overall loudness.
We have looked in more detail at some ways that audio compressors are used in music production in another article.
Limiters
A limiter is a compressor that has a high ratio setting. Sometimes the effects unit is called a compressor/limiter for this reason, or the limiter may be a separate device.
In theory a limiter is a compressor with a ratio setting of infinity:one, which results in the peak signal being squashed so much that the audio signal never exceeds the threshold. This is why limiters are sometimes referred to as a “brick wall” that squashes the signal flat. In practice a compressor with a ratio of 10:1 or higher would be considered a limiter.
Limiters are often used to make sure that the level of a signal never exceeds a particular level to avoid “clipping” and unpleasant digital distortion. The main control you find on limiters if the threshold control, which lets you adjust the level at which the audio signal will be “limited”.
De-Essers
A de-esser is a compressor that lets you target high frequencies for compression. This selective compression can reduce sibilance by reducing the level of audio frequencies in the range where excessive “s”-sounds are located.
Noise Gates
A noise gate lets you eliminate unwanted sound that are present at a very low level. The control lets you select the level below which the gate will close and block the low level noises. It is a little like a limiter in reverse, with audio below a certain level being squashed and made inaudible.
Expanders
The name of the expander effect can be quite confusing. It implies that it takes a sound and makes it bigger, when it’s actually the reverse. An expander is like a compressor in reverse.
When the level of a sound falls below a threshold the expander makes it quieter and less noticeable. This lets you reduce unwanted low level noise rather than removing it altogether, which is what a noise gate does.
Time-Based Effects – Reverb, Delay, Chorus, Flangers and Phasers
Time-based effects give your audio signal a sense of “space”. They give you the feeling that the sound is moving in some kind of enclosed space, with sound waves reflecting from surfaces and producing echos that may be subtle or quite obvious.
Reverb Effects
Reverb effects are used to give the impression that the sound you hear is being heard in an enclosed space. Reverb is often used as a “send” effect, with only a portion of the audio signal passing through the reverb processor, while the rest of the signal passes straight to the audio output.
The different types of reverb effect electronically replicate the natural reflection of sound waves from surfaces in the enclosed space. This involves the initial reflections followed by refections of the reflected sound, and further reflections, and so on.
Reverb effects are often described in terms of the size of a particular physical space, for example a concert hall, a basement, or a living room. Within each room type you are often given various options relating to size of that type of room. Choosing a pre-set offered by the effects processor can be quite simple if you can imagine the type of reverb that you want to achieve.
Reverb Processor Controls
Reverb effects processors can include many different controls, but there are a few that are found on most of them.
Reverb Decay Time
Reverb decay time is sometimes shortened to just reverb time or decay time. This is the time it takes for the reverberations to die away. In a larger enclosed space the reverberations usually take longer to die away than in a smaller room.
By increasing the decay time you can emulate the effect of the sound being played or sung in a room of increasing size. On some reverb units this may just be labeled in terms of room size, or type of room, or there might be a control that lets you set this in terms of actual time.
Pre-Delay Time
Pre-delay time can be confusing. This is the time, usually in milliseconds, between the sound being produced by the source and the first reflections reaching the listeners’ ears.
In reality the reflections never start immediately because it takes time for the sound waves to reach the reflective surface and be reflected. In the reverb effects processor it can be thought of as the time gap between the original sound going into the unit and the reverb being applied.
Pre-delay lets to change the apparent size of the space or room without making changes to the overall reverb decay time.
Diffusion
The diffusion control lets you adjust the apparent distance of the sound source from the listener. High diffusion levels will give the impression that the reverberations have traveled further and for longer, leading to them becoming more diffuse.
Delay Effects
A delay processor is the most basic of the time-based effects. It just makes a copy of the incoming signal and then outputs the copy after a short delay.
Delay Processor Controls
The controls available on a delay effects processor enable you to adjust the way the copy of the original signal is output in various ways.
Delay Time
The delay time control lets you adjust the time between output of the original audio signal and the copy. A long delay time results in a clear “echo” of the original audio, whereas very short delay times don’t produce a distinct echo but result in a kind of shimmer being added to the sound.
Feedback
The feedback control adjusts the number of repeats of the delayed signal. Low feedback settings produce few echoes and higher settings produce echoes that may go on for some time.
Chorus Effects
A chorus effect can be thought of as an electronic emulation of more than one instrument playing the same thing. When two seemingly identical instruments play or two singers sing the same notes it sounds quite different than one instrument or singer alone. This is due to tiny variations in pitch, timbre, articulation and a number of other factors that lead to the composite sound.
The chorus effects process makes a copy of the incoming signal, similar to a delay effect, but one of the copies has processing applied to it to make it a little bit different. When the processed signal is combined with the original you get the shimmering chorus effect caused by the variations.
Chorus Effect Controls
The controls on a chorus effects processor enable you to make adjustments to the way this chorusing is applied.
Rate
The thing that applies the processing to the copy of the signal in the chorus unit is a low-frequency oscillator, or LFO. The rate control adjusts the speed of the LFO, which produces variation the “shimmer” added to the sound.
Intensity
The intensity control is sometimes labeled “depth” and it lets you adjust the amount of modulation applied to the signal.
Flanger
“Flanging” is the name of the effect produced by a flanger and it refers to the effect produced when people touched and released the flange (the edge) of a tape reel, causing it to slow down and speed up.
When two synchronized tape machines played the same sounds or music and this was done to one of them, the slowing down took the sounds out of sync and the flanging effect was produced.
In an electronic flanger effect a copy is made of the original sound and an LFO is used to increase and decrease the delay time when the copy is combined with the original. This produces the flanging effect. It’s similar to the chorus effect but the delay time is much shorter.
Rate and Intensity
The rate and intensity controls on a flanger are similar to those on the chorus effects processor.
Feedback
A control that flangers often have in addition to rate and intensity is feedback. This lets you control how much of the signal output is fed back into the flanger. Higher feedback levels can make the sweeping effect more pronounced within the sound.
Phaser Effects
A phaser effect is similar to a flanger in the way the sound is split in two. In a phaser the phase of the copy is shifted relative to the original, which produces the phasing effect.
The controls on a phaser are similar to those on the flanger, with rate controlling the speed of the filter sweep.
Just Some Common Examples
We have only looked at basic aspects of some of the most commonly used audio effects processors. We’ll take a look at some additional examples, such as audio saturation effects in other articles.
We’ll also look at selected effects in more depth so that we can see how they they are used in professional audio productions.
