Why Use Audio Saturation Effects in Music Production?
I discovered the value of audio saturation effects in music production recently, and I wanted to find out more about it to see how it worked. I thought I would share some of what I learned here.
The reason I wanted to look into audio saturation further was my due to my recent experience with recording a song demo. It was a song I had written with a collaborator, where he wrote the lyrics and I wrote the melody.
Since I was writing the music it fell to me to produce a rough demo track to see if we could interest some vocalists in recording it properly. The backing track sounded pretty good, but my vocals sounded awful and I couldn’t work out how to make them sound better.
I tried making it louder and quieter, adding more and less compression, reverb, delay and pretty much everything else I could think of. It never occurred to me that it might be worth trying a saturation plugin.
Adding Saturation Effects Plugin Does the Trick
I knew that saturation (and distortion) can make an electric guitar sound great, taking a twangy, clean amplified sound and making it warm, rich and pleasing to the ear.
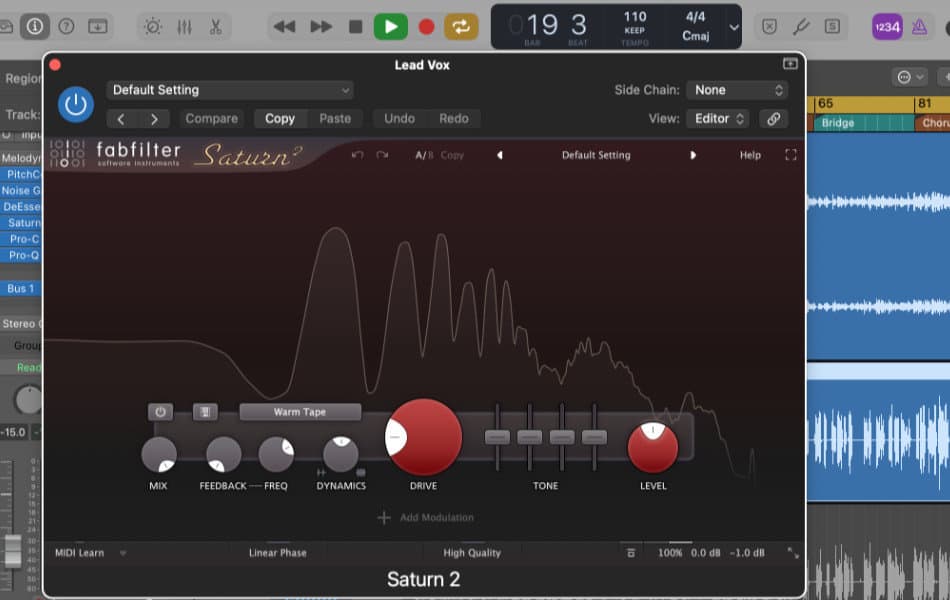
When I added a saturation plugin to my vocal track it actually sounded warmer, richer and more pleasing to the ear. Also, the lyrics and lines of the song seemed to blend into one another, whereas without saturation the sound was quite “disconnected”.
This made me wonder how a saturation plugin had succeeded where other plugins had failed, and I wanted to know more.
What is Audio Saturation?
Saturation is a type of signal distortion that happens in analog audio equipment when the components become overloaded by the incoming signal. The amplitude of the signal (how loud it is, kind of) is too big for the circuit components attempting to deal with it.
The result is that the signal saturates the circuit and the shape of the signal waves changes. This saturation compresses and adds additional harmonics to the signal, which make it more complex and this can make it sound better.
Audio saturation is one of the reasons why music producers using analog recording equipment in the past usually liked a “hot” signal. This meant that the level of the signal was so high that it “pushed the meters into the red” and the recorded sound was much better for the addition of this natural saturation.
If you try recording with the audio levels too high when using digital equipment it produces digital distortion, or clipping, which sounds terrible. This is one reason why saturation effects plugins are so useful in digital recording systems.
Tube and Tape Saturation
There are two types of saturation that you may have heard about: tube saturation and tape saturation.
As the names suggest, the first one is saturation applied when recording using tape, and the second is saturation resulting from the use of vacuum tubes, or valves, in the amplification of the audio signal.
Saturation effects plugins sometimes refer to these two types of saturation. One of these, the FabFilter Saturn 2 plugin, is used below to demonstrate some differences between them.
The differences between tube and tape saturation relate to the different types of harmonic information added to the basic sound.
Tube Saturation
Tube saturation is also known as “valve saturation”, since valve is another name for the vacuum tubes used in electronic circuits.
Vacuum tubes have a filament (a bit like a light bulb) called the cathode (negatively charged), which heats up and releases electrons into the vacuum. The electrons are attracted by the anode (positively charged) and so the electrons flow (in one direction), which is an electric current.

As the level of the signal increases you can reach the point where the system becomes saturated as too many electrons are forced to pass from the cathode to the anode.
This causes the signal to be compressed and distorted, and additional harmonics are added. This creates a warm, rich sound described as tube, or valve, saturation.
Tape Saturation
Magnetic tape used for audio recording is coated with magnetic particles, which capture the electrical signal representing the sound being recorded. There is a limit to how much signal the magnetic particles can handle, and above a certain point saturation happens.
When a signal is recorded to analog tape, the magnetic particles on the tape are magnetized by the incoming signal. As the signal gets louder, the magnetic particles become saturated, causing the signal to distort and compress.
As above, this creates a warm, rich sound that is often described as tape saturation.
Different Harmonics Produced by Tube and Tape Saturation
Tube and tape saturation can each produce a slightly different effect when applied to an audio signal. One reason for this is the different types of harmonic added by each type of saturation.
The diagrams below attempt to illustrate the harmonics added to an audio signal by the different types of saturation.
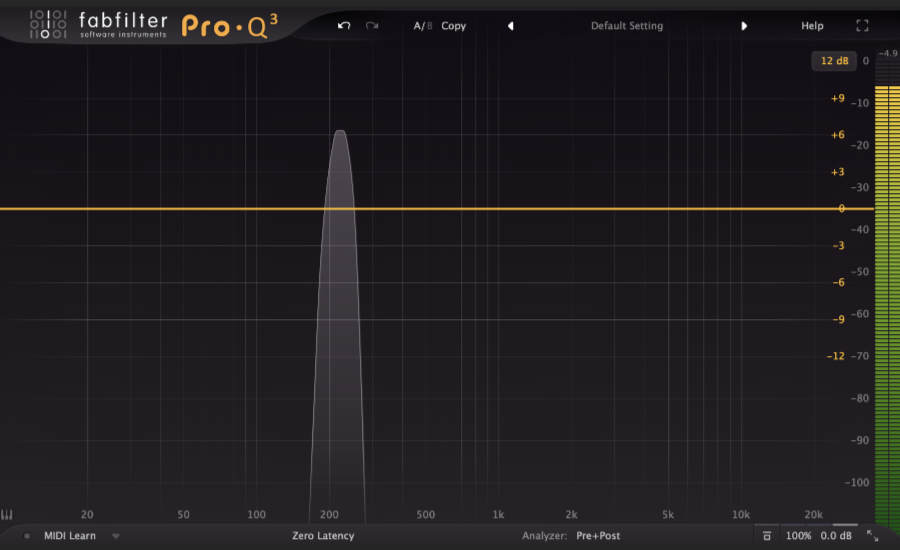
This little experiment used the Test Tone plugin in Logic Pro X, producing a sine wave at 220Hz (which is the pitch of A3 on piano).
The frequencies within the sound are displayed on an EQ plugin (FabFilter Pro Q3).
The first image below shows how the sound looks with no saturation applied. All you can see is the fundamental note (A3) with no additional harmonics visible.
This is what you would expect to see from a sine wave, since sine waves contain no additional harmonics apart from the fundamental frequency (harmonic 1).
No Saturation Applied
The diagrams below show how adding the FabFilter saturation plugin adds harmonics to the sound.
Tube Saturation
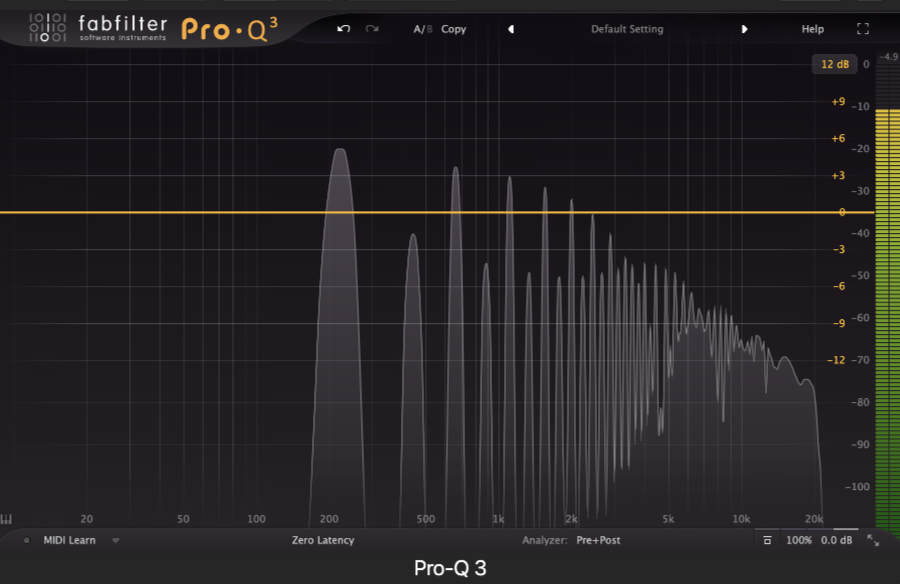
This diagram shows how tube saturation affects the sine wave. The Saturn 2 setting used was “Warm Tube” with “Drive” turned up to 100%.
As you can see, the tube saturation effect has added a number of harmonics (also called partials or overtones) to the fundamental pitch of 220Hz.
If you look at the pitches of the harmonics you may be able to see that they are multiples of the fundamental tone. The frequencies are 440Hz (harmonic 2), 660Hz (harmonic 3), 880Hz (harmonic 4), 1100Hz (harmonic 5), and so on.
Tape Saturation
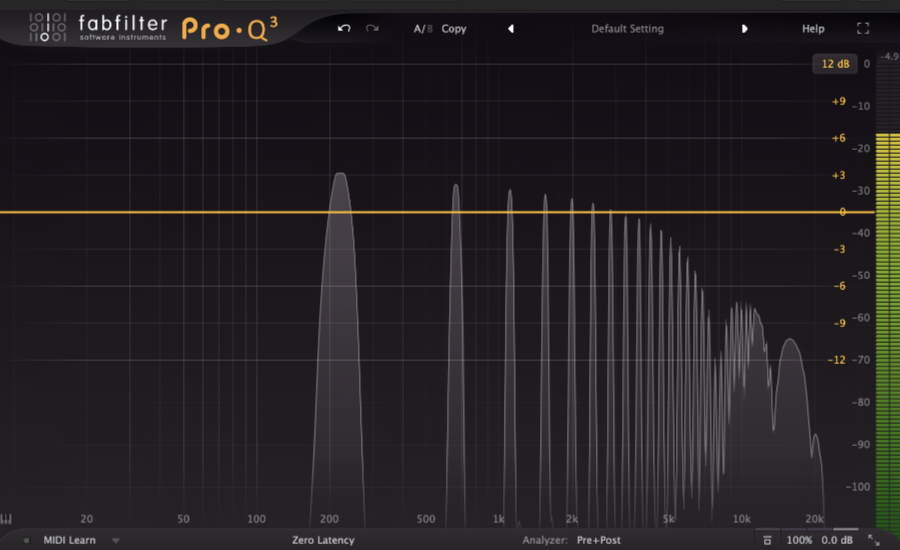
This diagram shows how tape saturation affects the sine wave. The Saturn 2 setting used was “Warm Tape” with “Drive” turned up to 100%.
The tape saturation has also added a number of harmonics above the fundamental, but this time some harmonics are missing.
Again, the harmonics are multiples of the fundamental tone, but only odd-numbered multiples have been added. The frequencies are 660Hz (harmonic 3), 1100Hz (harmonic 5), 1540Hz (harmonic 7), and so on.
Harmonics Added Similar to Saw and Square Waves
This made me think of the way additional harmonics added to a sine wave produces the saw and square waves found in synthesizers.
Saw waves contain all of the harmonics of the fundamental frequency, whereas square waves only contain odd-numbered harmonics.
I used an oscilloscope to look at the shapes of the waves produced by adding tube and tape saturation to the sine wave in the experiment above. The shapes of the resulting waves were approaching saw and square shaped (although still a little rounded).
It follows then, that the richness and warmth added to a sound by saturation effects follows from the way the effect adds harmonic complexity to a basic sine wave.
Saturation Also Compresses the Signal
Saturation, both tube and tape, also applies compression to the audio signal.
This means that the audio signal coming out of the component (tube or tape, or saturation plugin) will be “squashed” and its dynamic range reduced. This is compression.
I’m going to stick my neck out here… If you look at the images above, the green line on the right-hand-side indicates the level of the signal.
You can see the the level is higher where no saturation has been applied, and is a little lower where tube or tape saturation has been added.
It may be a little naive of me, but this appears to show that the signal has been compressed.
If you’re not sure how audio compression works you might like to have a look at our article on this topic.
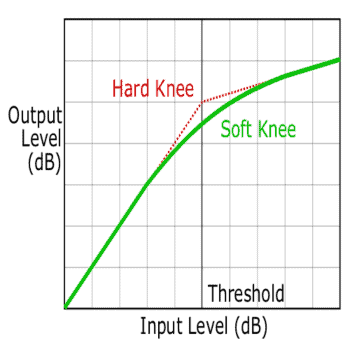
Briefly, a device that applied compression reduces the level of a signal that is above a certain level, known as the threshold. The extent to which the signal level is reduced is called the ratio.
The type of compression applied in saturation is usually “soft knee” compression, rather than “hard knee”.
This is where the amount of compression produced increases gently as the level of signal rises.
This gradual application of compression as the signal level increases adds to the natural, warm and pleasing effect that is heard with saturation.
Adding compression alone to audio makes it sound better. It balances out the loud and quiet parts of the audio, and makes the sound stand out and seem closer to the listener. Again, please see our article on compression for more information.
How Is Saturation Used in Music Production?
As discussed above, when music production and recording involved analog equipment the gear could naturally add saturation, which made the music sound better.
When thinking about how to use saturation effects plugins to enhance the sound of digital recordings we can look at what has been recorded and what analog equipment might have done to it.
Here are some examples:
Electric Guitar
This is quite an obvious one. In the past, guitarists used valve amplifiers to produce an overdriven, saturated (even distorted) sound. Compared with a twangy, clean guitar sound, this is very appealing, producing a rich sound and making the notes blend into one another.
Now it’s more likely that the guitar will be plugged directly into an audio interface and recorded digitally, with saturation effects added inside the DAW recording software.
Popular DAWs like Logic Pro or Ableton come with amplifier emulation plugins that enable you to add the saturated richness to the clean recorded sound.
Vocals
The vocal performances we hear on professional recordings, usually via streaming services like Spotify, have a number of audio effects applied to them. In addition, the vocal parts are usually doubled (at least) to make them sound richer.
This means that for you to get your vocal performance sounding half-way professional you need to will need to add various audio effects processors to the sound, and one of them will be saturation.
From my own attempts to make my vocals sound better (which is where I started with this article) I found that adding the saturation plugin before any others can be quite helpful.
When using analog equipment the saturation would be applied by the tape and valves (vacuum tubes) during the recording process. This means that the raw recorded sound would include the saturation, so that is a good starting point from which to add other effects as desired.
It’s important to remember that audio saturation includes some compression of the sound, so the vocal recording can sound a little more focused in addition to the richness produced by the added harmonics.
You should also find that the individual syllables of the vocal performance blend together, taking the “rough edges” off, a bit like the saturated guitar sound changing the twangy sound of an unprocessed recording.
Final Mix
One of the plugin effects often added during the final mixing and mastering stage is saturation.
Once again, this would have been added naturally in the past when using analogy recording equipment, but now we have to add it artificially using effects plugins.
As you would expect, saturation makes the mix sound fuller, with the “edges taken off”, and the included compression gives more presence to the overall sound.
In addition, the compression applied with the saturation helps to “glue” the parts of the mix together. You can read more about this glue compression in our article on the subject.
Some Examples of Saturation Plugins
Saturation is not one of the most obvious plugins to use. You often hear about reverb, delay and compression, but for some reason saturation, particularly subtle saturation, seems to be talked about less.
Here are some examples of saturation plugins that you might want to try. Some are included with DAWs, some are free, and even the paid ones usually have a free trial.
Saturation Plugins in DAWs
Ableton
Ableton Live (not Lite version) includes a saturation plugin called Saturator. Saturator uses a waveshaper to simulate the signal distortion that causes audio saturation. Various shaping curves are available and these can be modified using various controls to achieve the desired sound.
Logic Pro X
Logic Pro includes a number of “distortion” effects, and the one that seems to provide the type of audio saturation we are talking about here is called Clip Distortion. Apple say that this plugin passes the signal through a series of high-pass and low-pass filters, before combining this with the original sound, to produce the saturation effect.
Logic Pro also includes a Tape Delay effect, and there are several reports online saying that this can be used as a tape saturation effect. There is an interesting article here on how to do it, which includes a video with a demonstration.
Cubase
Cubase provides some saturation plugins like DaTube, which lets you add tube saturation effects to your sound. Probably, the most convenient way to add saturation though, is by using Cubase’s very useful channel strip. This includes Tape saturation section, which enables you to add and edit this effect using a drive knob plus low and high-pass filters.
Independent Saturation Plugins
Saturation Knob by Softube
The first thing to say about Softube Saturation Knob is that it is free. The next thing is that it works really well, despite (or maybe because of) its simplicity.
You can find out more about Saturation Knob here: https://www.softube.com/saturationknob
Have a look at the video below to see how it works. This is one you really need to try…
The saturation plugins that follow cost varying amounts of money, but they are all available on a free trial if you want to check them out.
If you decide to buy one (or more) of them, key an eye out for the Black Friday sales (and others throughout the year) to save quite a bit of money on the purchase price.
Soundtoys Decapitator
Soundtoys make some great plugins, and Decapitator is one that I hear producers talking about quite frequently.
The video below provides a demonstration of the Decapitator in action…
Soundtoys say that Decapitator offers five different analog saturation models to provide a starting point for the sound you are aiming for. The plugin also includes tone, filter and mix controls so that you can shape the saturation precisely to taste.
You can learn more about Decapitator here: https://www.soundtoys.com/product/decapitator
FabFilter Saturn 2
Just like Soundtoys, FabFilter make some amazing effects plugins. Something that makes FabFilter plugins stand out is the user interface. This provides much more information about what is going on than the hardware-emulating interfaces of the Softube and Soundtoys plugins.
The video below provides a demonstration of the what the Saturn 2 is capable of…
The Saturn 2 provides a selection of saturation models to choose from, with various options in each model. Two things that really sell the Saturn 2 is the ability to apply multiband saturation (different amounts of saturation within each frequency band of the sound) and the extensive modulation options.
You can learn more about the FabFilter Saturn 2 here: https://www.fabfilter.com/products/saturn-2-multiband-distortion-saturation-plug-in
So Why Add Audio Saturation Effects?
The main takeaway for me is that saturation used to be a natural part of sound recorded using analog equipment, and now it needs to be added separately to make the audio sound halfway decent.
I often heard people talking about vintage sound and I wasn’t really sure what they meant, since I thought new equipment must be better than old equipment. It turns out that in some ways it is, but in other ways it isn’t.
Adding saturation effects goes some way to achieving the vintage sound that’s hard to get with the raw digital recording equipment alone.
